Image Compression for People Who Just Want Smaller Photos
Most email providers cap attachments at 20-25 MB (Gmail and Yahoo at 25 MB, Outlook at 20 MB). Modern iPhone photos typically range from 3 MB to 12 MB depending on mode, so a handful of attachments will hit the limit. Compressing those files is usually the fastest way to make them send.
Why Your Phone Photos Are So Large
Phone cameras have become incredibly advanced, but they're often too high-powered for everyday needs. Many modern phones shoot at 48 megapixels. This means the file contains 48 million individual dots of color. While this looks great on a spec sheet, it's less helpful when texting a single picture takes thirty seconds because the file is as large as a short novel.
Other factors also contribute to these massive file sizes. HDR captures extra brightness and color data, while ProRAW mode holds onto every scrap of information the sensor picks up. A single ProRAW photo can reach 25 MB to 50 MB. If you accidentally leave this mode on, it'll fill your phone storage surprisingly fast.
These large files are rarely an issue while they sit in your camera roll. The trouble starts when you try to use them. Whether you're emailing a file, uploading a snapshot, or dropping an image into a slide deck, you'll quickly discover that a casual photo is often larger than a standard Word document.

What Compression Actually Does
Most people do not realize there are two ways to shrink a file. Choosing the right one depends on whether you are looking for pure speed or perfect quality.
Lossy Compression
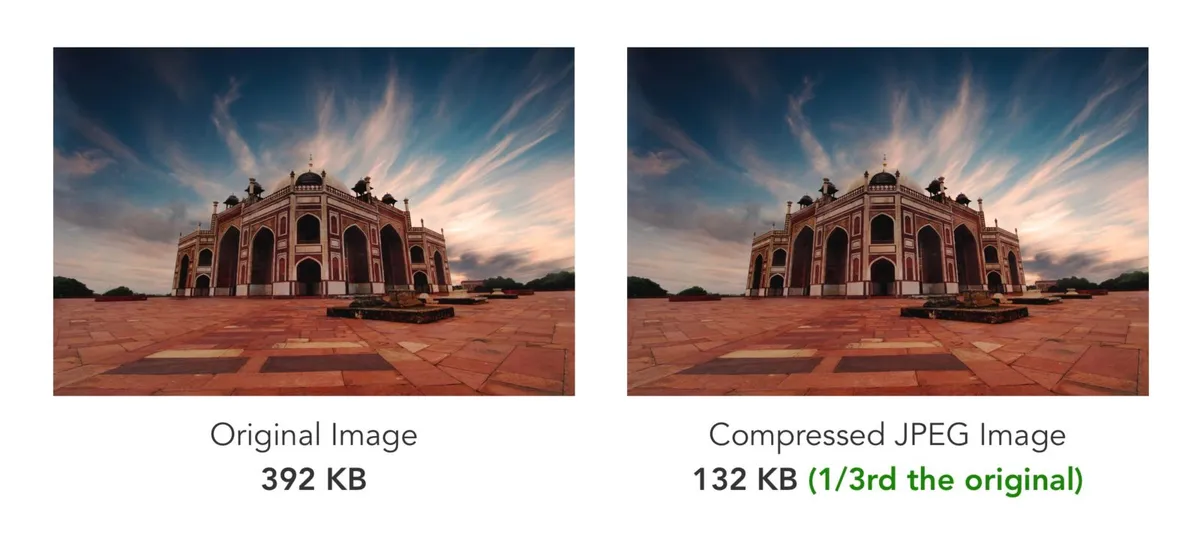
This is the most common method for photos, used by formats like JPEG and WebP. It works by identifying and permanently removing visual information your eyes cannot detect at normal viewing sizes. It simplifies subtle color gradients, fine noise patterns, and tiny texture variations. A 6 MB photo can become 600 KB while looking identical on a screen.
Lossless Compression
Lossless compression (PNG, TIFF with LZW) rearranges the data more efficiently without removing anything. The file gets smaller - typically 20-40% - and you can decompress it back to the exact original. The savings are much smaller than lossy, which is why most photos use lossy compression.
The quality slider in your compression tool controls this balance. At Quality 80-85, you hit the ideal sweet spot: the file shrinks by 80% or more, yet remains sharp to the naked eye. If you drop to Quality 60, textures begin to soften, and anything below Quality 40 will look noticeably degraded with muddy details and blocky artifacts. For almost every use case, staying in that 80% range provides a massive reduction in file size with no perceptible loss in quality.
Resize First, Then Compress
Before touching any compression settings, check whether the image is larger than it needs to be. This is the single biggest lever for reducing file size.
A photo straight from a modern phone is often 4000 to 8000 pixels wide. However, a website displayed on a laptop usually shows images at only 800 to 1200 pixels wide. Sending the full 8000-pixel image means the browser downloads all that data, then throws away 90% of it during display. Resizing to the actual display size typically cuts the file by 70% to 80% before any compression is applied. A width of 1600 pixels is enough to cover high-density displays.
For email, 1600 pixels wide is more than enough. For web use, match the image width to the container it will display in, using a 2x multiplier for high-density displays. For social media, platforms re-encode everything anyway, so 2000 pixels on the longest side is plenty.
The Slow Website Problem
Slow load times are a common problem for blogs and small business sites. This often happens because photos were uploaded straight from a camera, with each one measuring 4 to 8 MB. Fifteen such images can mean 60 to 120 MB on a single page.
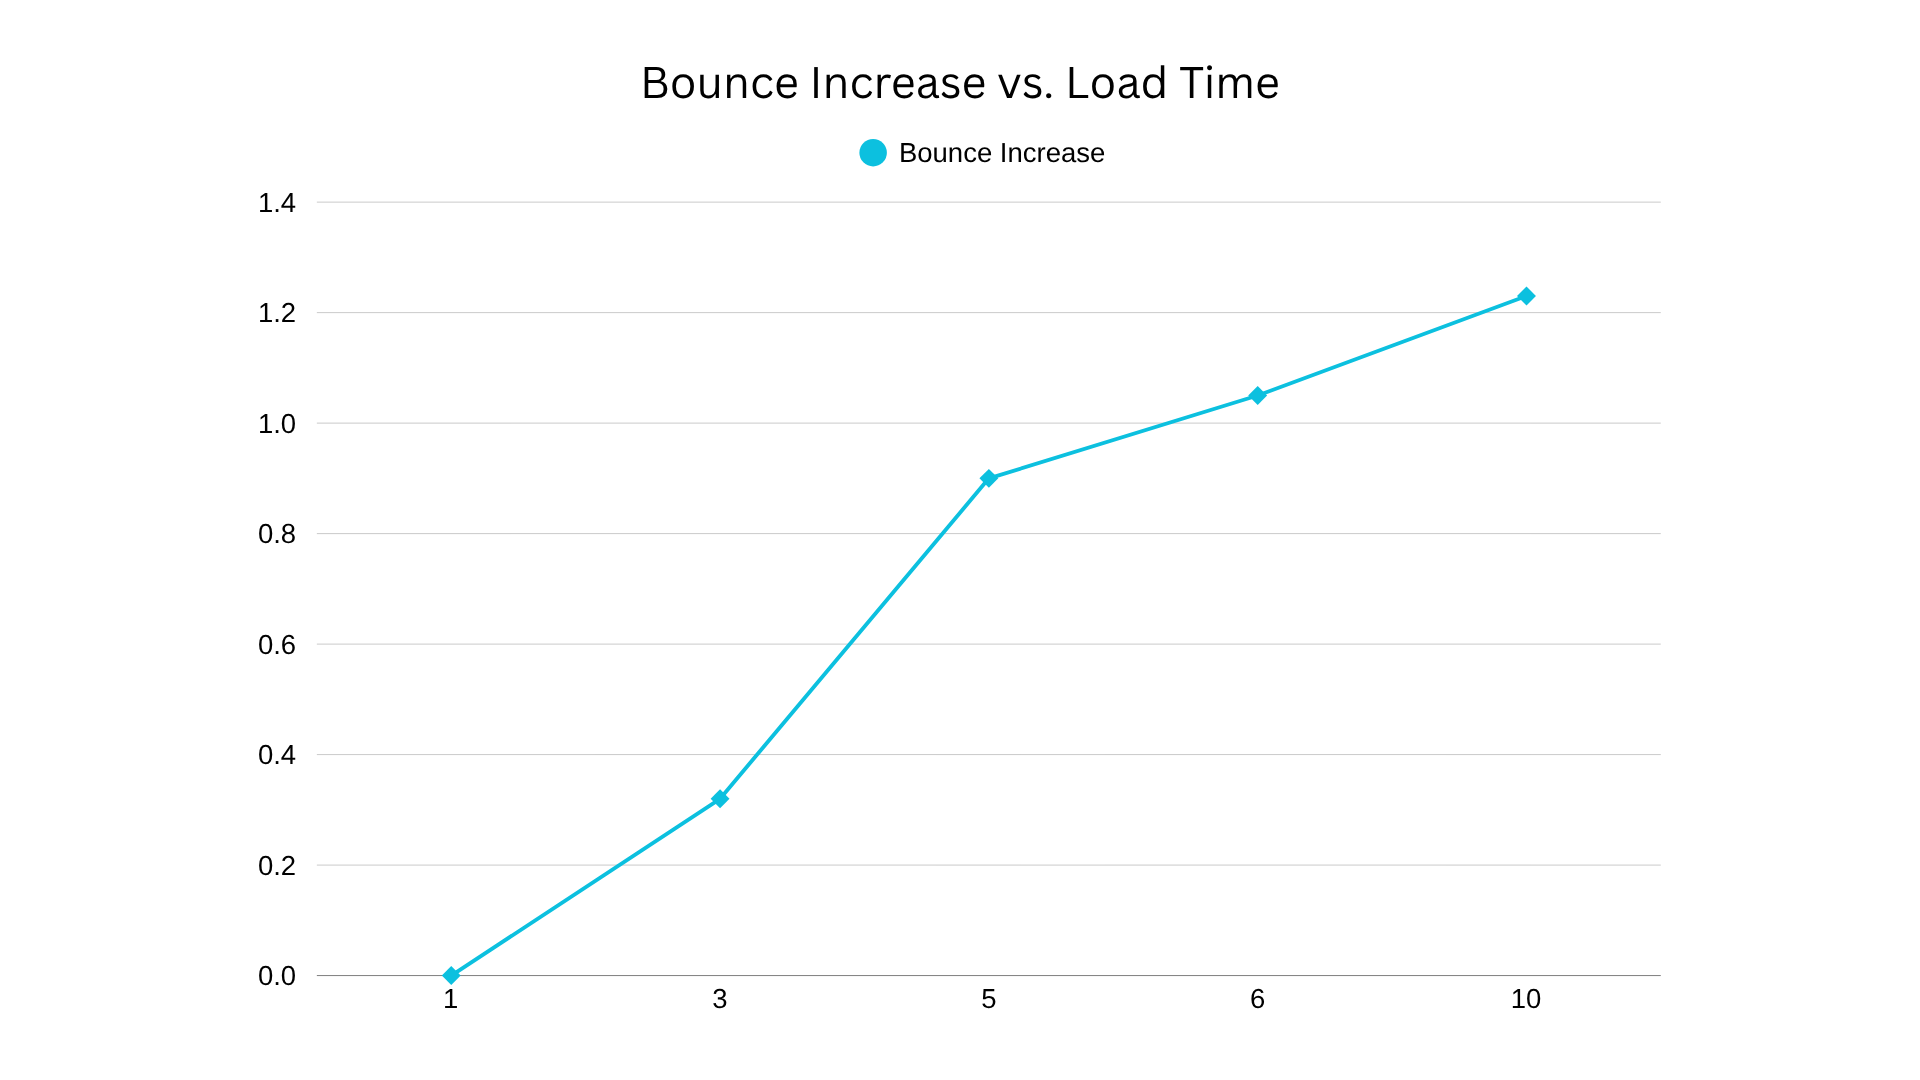
Google's research found that bounce probability increases by 32% when a page load time grows from 1 to 3 seconds, and by 90% from 1 to 5 seconds.
If you resize those images to the display size and compress them at quality 80, the same page goes from 60 MB to 3 or 4 MB. A six-second load time will become under two seconds.
Most of the Time, Nobody Can Tell
For the vast majority of your photo use, compressed images are more than just acceptable. They look just as good as the originals.
Instagram and Facebook recompress everything you upload anyway. They take your photo, run it through their own compression pipeline, and output their preferred format and quality. Uploading a full-resolution original gains you nothing because the platform is going to re-encode it regardless.
The same applies to email. The recipient is viewing your photo on a phone screen or a laptop. A well-compressed JPEG at 1600 pixels wide looks sharp on any screen and weighs about 200 to 400 KB. You could fit dozens in a single email at that size.
Websites and slide decks present the same situation. Side-by-side on a decent monitor, a JPEG at quality 82 and the uncompressed original are hard to tell apart. On a projector in a conference room, it is impossible to see a difference. A 200 MB PowerPoint full of uncompressed photos often crashes when you try to email it. If you compress those images, the same deck is 15 MB and looks identical on screen.
But Sometimes You Really Do Need the Big Files
Printing is the main exception where compression is the wrong call. While a compressed JPEG looks perfect on a screen, it can appear soft or blocky when blown up for a large poster or canvas print. Professional print shops require as much image data as you can provide. If you are delivering work to a client for wedding or product shots, you should always provide the full-resolution originals.
Archiving is another critical factor because compression is a one-way trip. You cannot un-compress a photo to recover lost detail later. For family memories or important documents you want to keep for decades, always save one uncompressed source file. You can easily create smaller versions from that source later, but you cannot go the other direction.
Finally, if you plan to do serious editing like heavy cropping, color adjustments, or retouching, work from the uncompressed version. Every time you save a compressed file, it loses a small amount of quality. Professionals perform all their edits in uncompressed formats and only compress the final output to avoid this cumulative degradation.
Settings by Use Case
Follow these guidelines to apply the right balance of size and quality for your specific needs:
- For emailing photos: Resize images to 1600 pixels wide and compress to a JPEG quality between 80 and 85. Using these settings can reduce a batch of 20 photos from over 100 MB to approximately 5 MB, fitting easily within the 25 MB limit for Gmail.
- For websites: Compress every image before you upload it. Use JPEG at quality 80 to 85 for photographs. WebP at quality 80 is often 25% to 30% smaller than a JPEG of the same visual quality. For logos or graphics with transparency, use PNG or WebP because JPEG does not support transparency. Most modern platforms like WordPress and Shopify can now serve WebP versions automatically if you provide the originals.
- For social media: Platforms like Instagram and Facebook re-encode everything you upload regardless of the initial file size. These platforms typically re-encode images to a quality of 70 to 75. Uploading a 50 MB original provides no benefit, as a 1 to 2 MB JPEG at 2000 pixels wide produces the same final result after the platform finishes its processing.
- Format choice simplified: Use JPEG for photographs and PNG for screenshots, graphics with text, or images that require transparency. WebP is the best choice for web delivery where file size is the priority. For logos and icons, use SVG because it is a vector format that scales to any size and usually stays within a few KB.
- Always keep originals: Store your full-resolution, uncompressed versions on an external drive or cloud storage. Compression is a one-way operation. You can always create smaller copies from an original later, but you cannot restore detail to a compressed file. Deleting your originals and keeping only the compressed versions is the one mistake you must avoid.
Quick Reference
Resizing to the target display width, typically 1200 to 1600 pixels for most uses, is the first step before compressing. This step accounts for 70% to 80% of the file size reduction, while compression settings handle the rest. Use the following table to match your specific scenario:
| Scenario | Source Size | After Resize + Compress | Format | Quality |
|---|---|---|---|---|
| Email photos | 5-8 MB each | 150-400 KB | JPEG | 80-85 |
| Website hero image | 5-15 MB | 80-200 KB | WebP | 80 |
| Blog post photos | 3-8 MB | 100-300 KB | JPEG or WebP | 78-82 |
| Social media upload | 3-8 MB | 500 KB-1 MB | JPEG | 85 |
| Print (keep high res) | 5-50 MB | Don't compress | TIFF/original | - |
In short: resize to the dimensions you actually need, compress at quality 80-85 for web and email, and keep the originals somewhere safe.