Shopify Image Optimization: What the Platform Does (and Doesn't Do) For You
Shopify stores are often blamed on a "heavy theme" when the real cause is a single collection banner uploaded at 8000x5000 pixels and 14MB. Shopify will happily serve that file to every visitor's phone.
Shopify does handle several parts of image optimisation - CDN delivery, WebP negotiation, and URL-based resizing - but it treats whatever you upload as the source of truth. A bad source produces bad derivatives. The performance problems live in the gap between what Shopify handles automatically and what needs to be right before the file reaches the admin.
What Shopify Actually Does
Shopify's image infrastructure handles several aspects of image optimization. These are the three most prominent:
- CDN delivery: Every image you upload gets distributed across Shopify's global content distribution network (CDN) powered by Cloudflare. A customer in Tokyo and a customer in Toronto both get your product photos served from a nearby edge server with no configuration requirements.
- Automatic WebP conversion: When a browser supports WebP, Shopify serves images in this format instead of the original JPEG or PNG. This alone can shave 25-30% off file sizes, and is done automatically.
-
URL-based resizing: Shopify can resize images on the fly through URL parameters (e.g.
?width=600), so you only need to upload one source file to generate variants.

What Shopify Doesn't Do
The following are three features Shopify doesn't handle for you:
- No upload compression: When you upload a 5MB JPEG to Shopify, that 5MB file becomes the source for every resized version. Shopify's URL resizing changes dimensions, but it doesn't aggressively recompress the image data. A poorly compressed 2048px source generates poorly compressed 600px derivatives.
- No intelligent cropping: Shopify's resizing is purely dimensional - scale down, maintain aspect ratio. It won't auto-detect your product and crop to center it. It won't remove excess whitespace. It won't reframe a landscape banner into a portrait crop for mobile. That's all on you (or your theme's CSS).
-
No automatic srcset for custom sections: If you're using Shopify's default product pages and collection grids, the built-in
image_tagLiquid helper generates reasonablesrcsetattributes. But the moment you build custom sections - a homepage hero carousel, a lookbook grid, testimonial blocks with photos - you're responsible for specifying which sizes the browser should choose from. Most custom theme work in practice just hardcodes a single image size, which means desktop users download mobile-sized images or, more commonly, mobile users download desktop-sized ones.
Compress and Resize Before Uploading
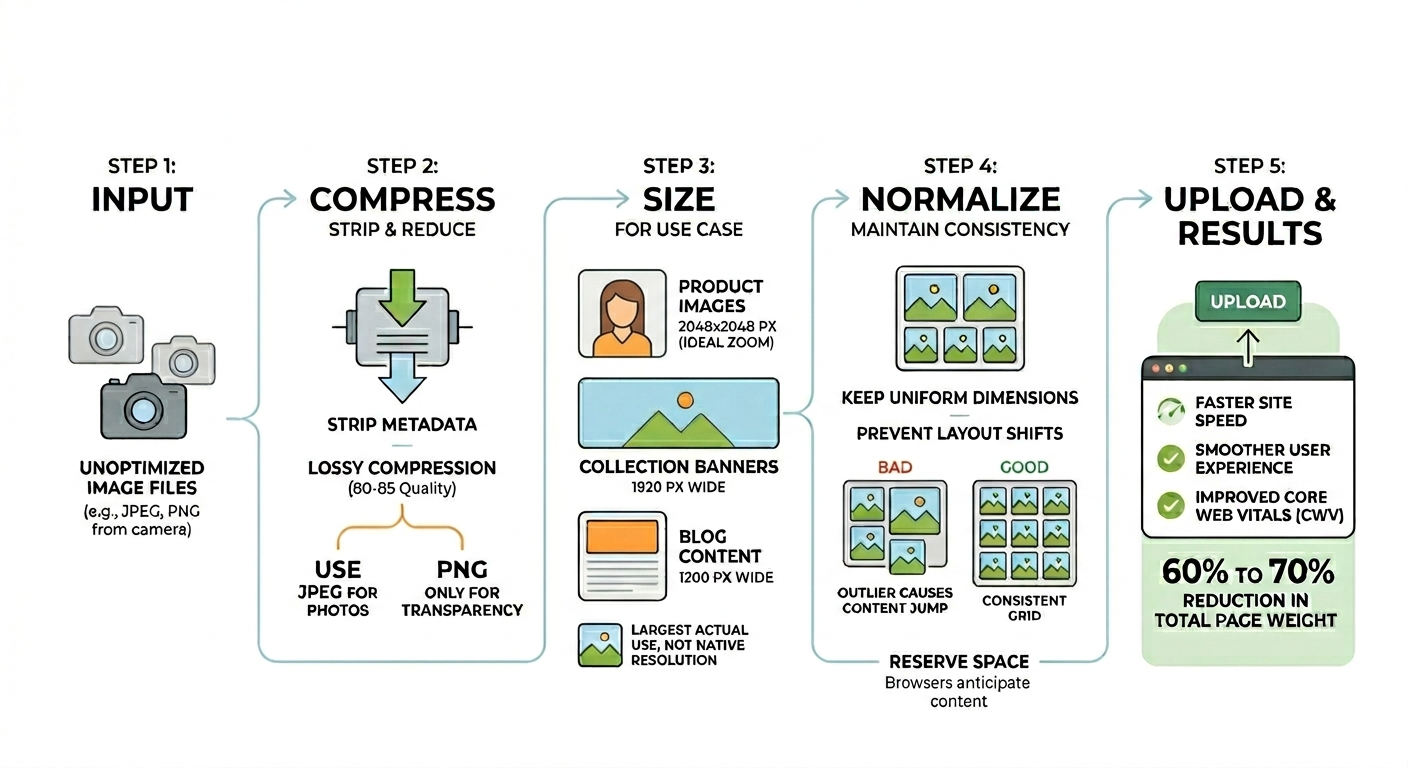
Every image should be compressed and sized before it reaches the Shopify admin. Running every file through a compressor to strip metadata and applying lossy compression at a quality level between 80 and 85 is a highly effective starting point. Using JPEGs for standard photos and saving PNGs only when you specifically need transparency can further streamline the process. This single step typically reduces total page weight by 60% to 70% for stores that previously uploaded uncompressed exports.
Sizing images for your largest actual use case rather than your camera's native resolution helps maintain site speed. For product images, 2048x2048 pixels is often the ideal choice because it is large enough for Shopify's built-in zoom functionality while providing the platform plenty of room to generate smaller derivatives. Going larger can waste storage and upload time without providing a noticeable visual benefit. For collection banners, 1920 pixels wide is usually sufficient, while 1200 pixels wide generally covers even the widest blog content columns.
Consistent dimensions across a catalogue also prevent layout shift during loading. When most product images are 2048x2048 but one is 1800x2400, browsers reserve different amounts of space per aspect ratio, and the content can jump as images resolve. Uniform dimensions help protect the CLS part of Core Web Vitals.
Product Image Specifics
White backgrounds compress significantly better than busy alternatives. A product on a clean white background might compress to 80KB, while the same product on a textured lifestyle background can reach 250KB. This is not an argument against lifestyle photography but rather a reason to be strategic about where to use it. Using clean, compressible versions for main product images in grids and search results keeps the store fast, while lifestyle shots are better reserved for the gallery.
Consistent lighting also helps reduce file sizes across a catalog. Images with similar color profiles and exposure levels compress more predictably and efficiently. A well-lit studio setup produces files that are easier to optimize in bulk. In contrast, mixing phone snapshots, professional photos, and manufacturer-provided images creates an unpredictable variety that is much harder to manage for performance.
Liquid Helpers: image_tag vs img_url
If you're touching theme code at all, it's vital to understand the difference between image_tag and img_url.
image_tag is the newer, smarter option. It generates a complete <img> element with srcset, width, height attributes, and handles lazy loading. As it is inherently more robust than img_url, it should be employed whenever possible.
{{ product.featured_image | image_url: width: 600 | image_tag:
   loading: 'lazy',
   widths: '200,400,600,800' }}
img_url is the older filter, which simply returns a URL string. It gives you more control than image_tag, but none of the automatic responsive image behavior.
<img src="{{ product.featured_image | img_url: '600x' }}" alt="{{ product.title }}">When Third-Party Image Apps Are Worth It
Shopify's app store has dozens of image optimisation apps. Some are useful; many add more overhead than they remove.
Bulk-compression apps are genuinely helpful if you've inherited a store with thousands of uncompressed uploads - they can recompress existing assets without you re-uploading everything. Some also generate alt text in bulk, which helps with accessibility and SEO.
Apps that inject JavaScript to intercept image loading and reroute through a separate third-party CDN are more questionable. The script itself has to download, parse, and execute before any image starts loading, which can be slower than Shopify's built-in CDN on its own. There's also a dependency risk: some apps rewrite image URLs in the theme, so uninstalling them leaves every reference broken.
☞ Rule of Thumb: if you're setting up a new store, compress before uploading and skip the app entirely. If you're inheriting a store with years of bloated uploads, use an app for the one-time bulk pass, then uninstall it and fix your workflow going forward.
Example: 18MB to 1.4MB, LCP 8.1s to 2.3s
A store like the one described in the opening, with a 14MB banner, typically requires about two hours of work to fix. This involves compressing and resizing all existing images, switching the hero section to liquid image tags with proper width parameters, adding preload hints for above the fold images, and confirming lazy loading on product grids.
On a throttled mobile connection, these adjustments dropped the homepage load time from 11 seconds to 3.2 seconds. Total page weight went from 18MB to 1.4MB, and the Largest Contentful Paint (LCP) metric improved from 8.1 seconds to 2.3 seconds. These results required no extra apps or monthly fees, just properly sized images served through Shopify's existing infrastructure.