Image Compression for Photographers: A Guide for People Who Actually Care About Quality
Exporting is often treated as a technicality at the end of the process, but it's the step that decides whether your colour work and fine detail actually survive the trip to the viewer's screen. Careless export settings can undo hours of grading in a single save.
Compression Is Different for Photographers
Web developers approach compression as a performance problem: smaller files, faster loads. For a photographer, the pixel data is the deliverable, so the goal is different - to reduce file size as far as possible without damaging the work. That changes both the acceptable quality range and the workflow.
The Problem Is That Compression Needs Change Depending on Context
The same image requires different levels of compression depending on your current goal. Whether you need zero compression or an aggressive reduction in file size depends entirely on what you are doing with the file at that moment.
- Editing and Storage: This is where you work within your Lightroom catalog, Capture One sessions, or Photoshop files. You want zero compression or lossless compression only at this stage. You are making destructive adjustments to pixel data, so you don't need compression artifacts creeping in before the image is even finished.
- Delivery: This is when images go to clients, your website, or social media. Lossy compression enters the picture here, and this is where the most important quality decisions are made.
- Archival: This is the long game. You want to be able to go back to any image ten years from now and re-export it for whatever new medium exists. This phase focuses on preserving originals and keeping your future options open.
Most compression mistakes happen because photographers apply archival thinking to delivery or delivery thinking to archival. These are different problems that require different solutions.
Why Shooting RAW Gives You Compression Flexibility Later
Shooting JPEG in-camera is a mistake if you care about the quality of your final output. The RAW (not an acronym) format is preferable because a RAW file acts as your digital negative. It preserves every bit of data the sensor captured without baking in permanent compression choices. When you shoot JPEG, you are letting the camera processor make irreversible decisions about your color and compression before you even see the image.
RAW gives you the freedom to choose compression levels at the end of your workflow, when you actually know what the image needs. An image destined for a large-scale billboard requires vastly different settings than one destined for Instagram. A RAW original allows you to do both, whereas a camera JPEG gives you one shot that is already compromised.
The Export-for-Web Workflow
This is the transition from your creative workspace to the final viewer. You have finished the edit, and the export settings you choose in the next thirty seconds determine whether your work actually reaches the screen as intended.
- Color Space: sRGB. Your working space is likely ProPhoto RGB or Adobe RGB, and moving to sRGB feels like a technical downgrade. However, the majority of consumer screens use sRGB, and many web browsers don't properly manage embedded profiles. If you export in Adobe RGB for the web, your colors will look muted and incorrect to almost everyone. Save the wide gamut for print output.
- Resolution: 72-150 PPI, sized to display dimensions. There is no reason to upload a 6000-pixel image for a blog post that displays at 1200 pixels. You should resize on export to reduce the file size dramatically before compression even begins. This also prevents the browser from performing its own unpredictable downscaling.
- Format: JPEG for photographs. While WebP and AVIF deliver better quality-per-byte, JPEG remains the universal standard. For photographic content, a well-optimized JPEG at the correct quality level is still effective. You should use modern formats if your site supports them, but JPEG is the safe choice if you are unsure.
Quality Settings for Client Deliverables
Clients expect high-quality files because they're paying for them, but high quality doesn't mean uncompressed or maximum file size.
For full-resolution deliverables that a client might print or archive, a 92-95% quality setting is the ideal balance. At this level, compression artifacts are virtually invisible even under close inspection, yet you're still cutting the file size significantly compared to an uncompressed TIFF. Most clients won't ever tell the difference between 95% and 100%, but they'll certainly notice if a gallery of 500 wedding photos takes four hours to download.
The 80-85% quality setting is more appropriate for proofing galleries where clients browse to make their selections. Because these are viewing-size images rather than final deliverables, they need to look good without being archivally perfect. Dropping to 80% ensures faster gallery loads and creates a better experience for clients who can finish reviewing their images instead of wandering off while a page buffers.
Quality Settings for Portfolio Sites
Your portfolio is your storefront, so it has to look incredible. It also has to load fast because a potential client who waits six seconds for your hero image to render is a potential client who has already clicked away.
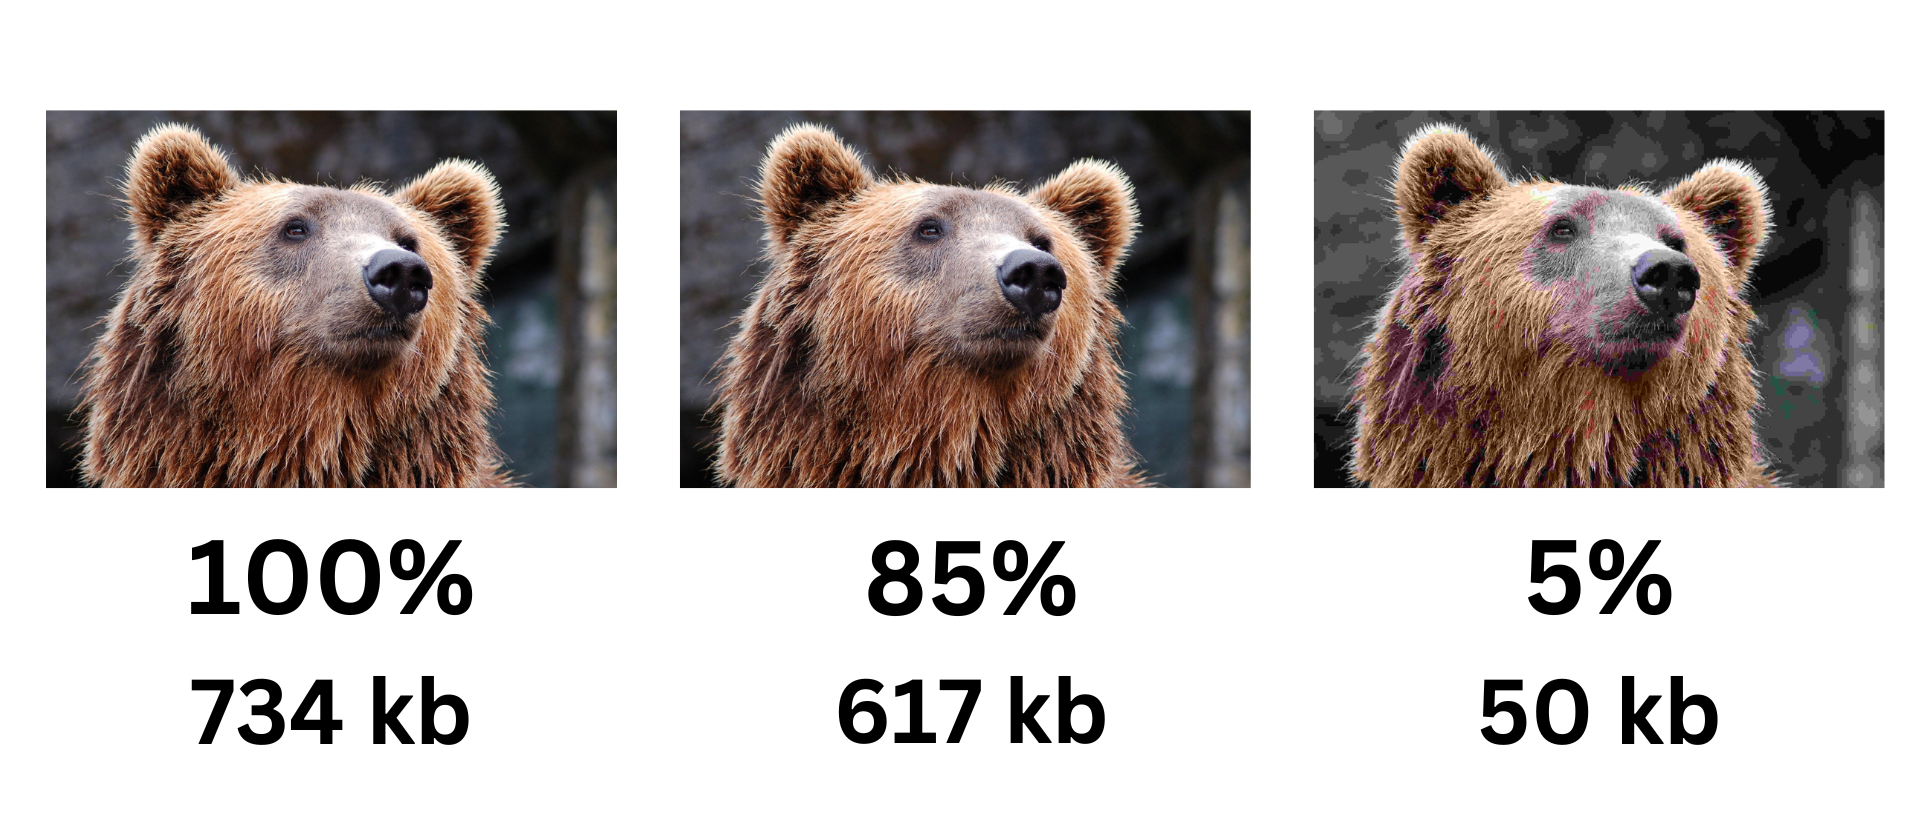
The compromise zone for JPEG quality typically sits between 82% and 88%. Most photographic images retain their visual integrity at 85%, which preserves clean gradients, accurate skin tones, and sharp details while shedding enough weight to load quickly. You'll start seeing artifacts in skies, banding in gradients, and mushiness in fine details once you drop below 80%. Conversely, settings above 90% significantly increase file size for quality gains that virtually no one viewing a portfolio on a laptop screen will perceive.
To find your target number, export a representative portfolio image at several quality levels (say 80, 85, 88, 92), view them at the actual display size in a browser, and pick the lowest setting where you can't see a difference from the original.
Print vs. Screen: Two Different Universes
Print and screen have completely different requirements, and settings that work for one will fail badly for the other. You must know where the image is going before you export it. It's a two-second decision that prevents a lot of wasted time.
- Print needs high resolution, typically 300 PPI at the output size, minimal compression, and often a CMYK or Adobe RGB color space depending on the printer's requirements. If you send your print lab a 72 PPI JPEG at quality 80, you will get back a blurry, artifact-riddled print that looks nothing like what you saw on your monitor.
- Screen needs appropriate pixel dimensions, aggressive but tasteful compression, and sRGB color. Browsers ignore PPI. If you send a 300 PPI TIFF to your website, you will have a beautifully detailed image that nobody ever sees because they left before it loaded.
Choosing the right output settings ensures your vision survives the transition from your workstation to the final medium. Whether the destination is a physical page or a digital display, matching the technical specifications to the platform is a necessity.
Watermarking and Compression Order
Always compress after watermarking, not before. If you compress first and then add a watermark, the watermark introduces new sharp edges and text into an already-compressed image. The encoder has to deal with those new details on top of existing compression artifacts if you then save again. It's usually a visible halo of extra artifacts around the watermark, which is exactly the area where you want things to look clean and professional.
Watermark first on the full-quality export, then run compression. This ensures one round of lossy encoding rather than two. It's a straightforward sequencing change that prevents degradation and keeps your branding sharp.
Uploading to Social Media
It doesn't matter how carefully you optimize your image for Instagram or Facebook because they are going to recompress it anyway. Both platforms run uploaded images through their own compression pipeline, and it's aggressive. Your expertly crafted JPEG at quality 85 gets re-encoded at whatever quality their algorithm decides, and you have zero control over the output. This automatic processing often introduces artifacts that you didn't see in your original edit, which can ruin subtle gradients or fine textures.
It's often more effective to upload at higher quality than you think you need as a counterintuitive strategy. If you upload a file that's already heavily compressed, the platform's recompression works on degraded source material and the extra artifacts will stack. The platform's compression has cleaner data to work with if you upload at 90-95% quality.
Additionally, size your images to the platform's preferred dimensions before uploading. Instagram will downscale and recompress a 6000-pixel image, which creates two degradation steps. You eliminate the downscale step entirely if you upload at 1080 pixels wide.
Backup and Archival: Future-Proof Your Work
The archival strategy is simple: keep your RAW files forever. These are your originals. Every JPEG, WebP, and export you've ever made is a derivative created for a specific purpose. Purposes and technology change. The JPEG you exported in 2024 might not meet the requirements of whatever platform exists in 2030, but you can re-export if you have the RAW file.
A sound archival workflow involves RAW files going to two separate physical drives plus one cloud backup. Edited files like the Lightroom catalog get the same treatment. JPEGs and other exports are disposable because they can always be regenerated, but the same can't be said for the RAW data.
☞ Rule of Thumb: Don't compress your archives. Storage is cheap and getting cheaper, so use it. It's better to have an uncompressed file you don't need today than a compressed one that isn't high enough quality when you need it.
Practical Summary: 82–88, sRGB, Keep the RAWs
JPEG quality 82-88 is the working range where most photographic images hold up on screen. sRGB is the only colour space that behaves consistently in browsers. RAW originals are the one thing you can't regenerate, so keep them. And know the destination before you hit export - a default preset will quietly degrade your work if nobody changes it.